Actually the title should read more like, "Twice Baked Cakes and Cupcakes" to be accurate.
The reason is that the insides are baked first in a separate step
and then baked again with more raw batter.
Remember this cake from my last post?
I just couldn't wait to experiment some more!
Good thing we had a long holiday weekend so that
I could play Barbies in the kitchen all day long.
My head is just filled with things to try inside cakes and cupcakes!
At 3:30 am this morning, cones were calling.
Must've been on my brain from my recent snow cone cupcake post.
Who knows? Anywho, cones were first at bat in the oven today.
It had been several years since I made the snow cones but the cans and cups were still waiting for me.
I'd forgotten about the very minor fumes from the empty V-8 juice cans I'd used way back then.
Word to the wise: find a can with no plastic coating, inside or out to support the cup while baking.
I plan to try the chrome plated egg cups next time or maybe Wilton's King Sized Muffin pan.
A metal rack for ice cream cones might also work.
I'm fairly certain my V-8 can method is no where near food safe.
Who knows what kind of drain bramage I caused myself already.
That would explain SO many things!
Please be safe and let me know if you come up with a better solution.
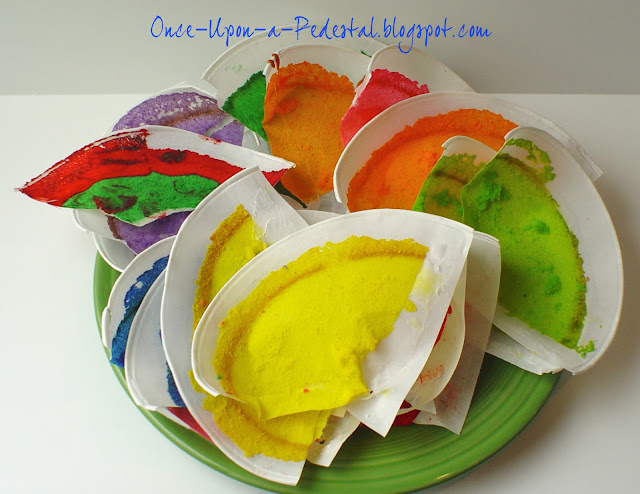
These are the empty wrappers from today.
Since snow cones were the goal last time and they weren't to be
removed from the liner until eaten, I didn't worry about the cake
releasing from the paper so much. It stuck more than I'd have preferred.
Next time I plan to try an inner liner of either parchment
or waxed paper inside the paper cone. Baking spray probably
won't work since the paper is somewhat more porous than cupcake liners.
You can see that I combined two colors in one cup in the red/green paper above.
Fun little surprise when I opened that cone.
The green on the bottom had baked up inside the center of the red.
Not sure if this happens every time but it might be worth looking into.
Here are the naked cones inside a prepared 9 inch round.
A thin layer of batter went in first then the rest was dumped on top to cover.
I added an additional 1/4 cup of water to the cake mix this time
so that it would be thin enough to flow around the shapes.
I'd also trimmed the top and bottom of each cone to level them up a bit.
The tips of the cones all stuck in the very points of the cups
but I wanted a blunt end anyway. So it was all good.
Photo used with permission of Kerry Vincent.
Forgive me Kerry Vincent, for I have sinned. On purpose.
I made no attempt whatsoever to do a good job at frosting or decorating
the following cakes and cupcakes you'll see in my next few posts.
I really wish they would have magically decorated themselves.
For your sake. But I was beyond caring about the outside.
My mommy always told me, "It's what's inside that counts."
Let's hope so.
I am the slowest decorator ever and I REALLY
wanted to get to the heart or the guts of the matter in this case.
(I had a punk boss many years ago whose favorite saying to me was,
"You may not be good but you sure are slow!" Still true. And he's still a punk.)
So please forgive what you are about to witness.
Plain. White. Frosting.
Not even smoothed down. Shameful.
Okay. I caved and smoothed a tiny bit.
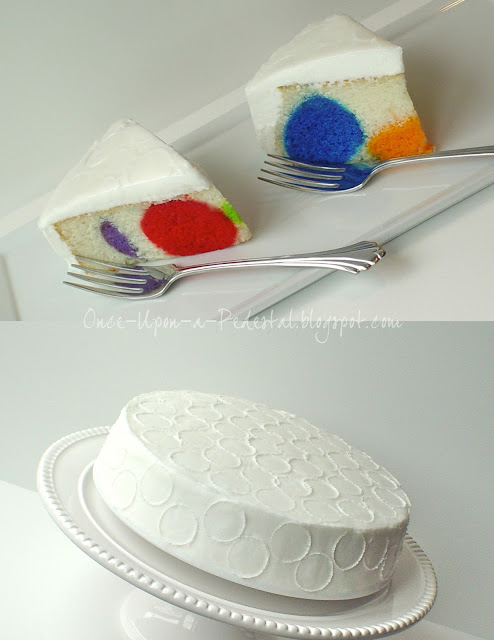
The embossed circles were added with the large end of a giant piping tip.
Notice the red/green one? That's the one I was telling you about earlier. Cool.
I was hoping to end up with larger and smaller polka dots with this cone method.
Perhaps if I'd arranged them differently.
So when it came right down to it, I still had no idea what the middle would look like.
But I LOVE the bright colors!More experiments to come . . .


9 comments:
Beautiful! What whimsy! I love the colors of course, but the plain white frosting with the repeating circle pattern is just a hint of the burst of color once the cake is cut!
This is an incredibly creative idea and solution!
Just found your blog thru Cakes Decor. Your cakes are amazing! So very creative. I can't wait to try this out. Thank you :)
Radhika
I was wondering how you prevent your colored dots from rising to the top while baking and sticking out-like .5 inch above the white batter? I am assuming based on how your cake looks with white above and below the dots that this doesn't happen to you?
Awesome I love this. Definitely going to experiment with the same idea :)
My sister wanted a Red Velvet cake with polka dots on the inside for her birthday. It turned out really well! Thank you...
Part Time Wife,
Hooray! Hope you had a wonderful party.
Deborah
I loved the outside of the cake! So elegant and refined then the cake is cut and Bham! this burst of color is the life of the party!! What a great cake for a bridal shower for "Girls who just want to have Fun!"...in an elegant way:)
Boarding Mom 1: Thanks so much for the kind words and for stopping by! Happy Caking!
Post a Comment