Showing posts with label hidden shapes. Show all posts

Friday, February 20, 2015

Surprise Inside Cake - Hidden Road

surprise-inside-cake-road-construction-deborah-stauch

Easy. Cake mixes. Canned frosting. Candy Melts & molds. Chocolate rocks and stickers. You can do this!!!

surprise-inside-cake-road-construction-deborah-stauch

The little hard hat and truck are made from Candy Melts and edible images. The truck was actually my inspiration for the whole project. Once I saw it the wheels really started turning. In my head of course. That particular chocolate truck wasn't going anywhere but in my tummy.


surprise-inside-cake-road-construction-deborah-stauch

The barricade, vest, shovel and sign are stickers that I happened to have for just such an occasion. Edible versions would've been fun also but what a time saver they ended up being.


surprise-inside-cake-road-construction-deborah-stauch

The hat was molded from a chocolate mold but I had no pickup truck. Woe was me. I always peek at the seasonal isle of the grocery store and that fateful day, I happened upon a chocolate colored pickup for Valentine's Day by RM Palmer Candy. I thought about using green luster dust to get the company color but then I noticed that the package used to protect the truck from moving around might actually be used as a mold. The plastic used to make it was thinner but it proved to be sturdy enough to mold the two trucks I needed. With careful handling, you could use reuse this mold at least several times. And who doesn't love a mold filled with FREE delicious chocolate for about a dollar? Check them out the next time you find yourself in the holiday isle.

surprise-inside-cake-road-construction-deborah-stauch

If you can't find a pickup mold, there are lots of cute construction equipment molds that might suit your theme. Adorable for a child's party.


Even with all of the inspiration that the truck offered, I still had to find a way to hide the road inside. Ever wonder why simple ideas don't occur to you earlier? It was just never a problem that I needed to solve until that day but the solution was SOooo easy!

surprise-inside-cake-road-construction-deborah-stauch

The sides and ends of the cake were covered in the leftover crumbs from the cake trimming. Just give them a few pulses in a food processor and they magically turn into delicious chocolate asphalt!

surprise-inside-cake-road-construction-deborah-stauch

The rocks are Silver Nugget Choco Rocks. I purchased them at my local party supply store but you can also find them online here.

Let's get this construction project underway shall we?


You'll need some equipment:

2 large loaf pans (to hold one cake mix each)
4 baking nails
Large insulated shiny cookie sheet (optional)
Baking strips (optional)
Food processor or similar
Chocolate molds of choice (optional)
Rolling pin with 1/8" spacing bands or 1/8" dowels
Ruler
Exacto knife or similar

And some ingredients:
Cake
2 Devil's Food cake mixes plus ingredients on box
12 oz package Nestle mini chocolate chips
1 T vanilla
Americolor black gel coloring
1/2 c Hershey's Dark Chocolate syrup OR simple syrup, divided

Frosting & Decorations
2 cans chocolate frosting + 6 T powdered sugar
OR homemade frosting
Candy Melts for modeling chocolate and optional molds
Corn syrup
Oil based candy color for optional molds if needed
Chocolate candy rocks

One day in advance:
Make a small batch of white and black modeling chocolate. You can find the recipe here by my friend and modeling chocolate expert, Jessica Harris, along with helpful tips and tricks. And if you haven't taken any of her Craftsy classes, you're missing out.

You can also make the strips for the exterior and interior road stripes but until your cake is baked and measured, your spacing might be a little off. Just make the long strips and wait to slice them into the stripes until you decorate the cake.

You can also mold the optional decorations in advance or wait until you need them.

Method:
Mix the two cake mixes as directed on package. Add the vanilla, mini chocolate chips and coloring. You can leave the chips out if you'd prefer but they make a nice texture and add interest to the cake.

Preheat oven to 350F. Grease and flour or use baking spray to prepare the loaf pans and baking nails. Or line with parchment if you prefer. Place 2 baking nails in the center of each pan.

Divide the batter evenly between the 2 loaf pans. Add baking strips if desired for flatter cake. I also use a shiny insulated cookie sheet under the pans to prevent a thick crust.

Bake at 350F for about 60 minutes or until cake springs back when touched lightly in center and pulls away from edges.

Remove from oven and allow to cool slightly. Flatten cake tops with a damp paper towel and the bottom of the second pan. Be careful of the baking nails! Repeat for the second pan.

Brush the warm cake with the chocolate syrup or use simple syrup instead. Cool for 15-20 minutes and invert cakes onto parchment paper or a cooling rack.

When cakes are cool to the touch, wrap well in plastic wrap or foil and freeze until firm. Trim the tops of the cakes to 2" height while firm. Reserve the cake scraps.

surprise-inside-cake-road-construction-free-tutorial-deborah-stauch


Place one of the trimmed and cooled cakes on a cake board, plate or serving tray. Protect the edges with waxed or parchment paper for easy cleanup later on.


Tint the chocolate frosting to black and add 3T of powdered sugar per can to thicken slightly. About 40 drops of Americolor black gel per can gives you a nice black. Frost the top of the cake with an flat, even layer of frosting and set aside.


Knead the modeling chocolate until easy to work with. Roll the white modeling chocolate on a flat surface to 1/8" thickness using spacing bands or your rolling pin or dowels as a guide. Allow to set up slightly then slice into 5 strips about 1/8th inch wide by 1/8th inch thick or deep by the length of your cake. 


Depending on the finished size of your baked and cooled cake, you may need to adjust these measurements. Roll extra strips for the exterior of the cake at this time. I used 5 white and 4 black segments for the inside of my cake and 8 white for the exterior (no black needed for the top since they are just laid on top of the black modeling chocolate road) but do whatever pleases your eye.


surprise-inside-cake-road-construction-free-tutorial-deborah-stauch

I used the template above to plan what the slice of my cake would be. It was about 4.25 inches square.

Clean the work surface and tools and roll out 4 strips of the black modeling chocolate to 1/8th inch thickness by 1/8th inch wide by the length of the cake.

surprise-inside-cake-road-construction-free-tutorial-deborah-stauch

Place the strips along the long side of the cake.


surprise-inside-cake-road-construction-free-tutorial-deborah-stauch
Start with white at the edge and alternate with black until you reach the other side.

surprise-inside-cake-road-construction-free-tutorial-deborah-stauch

You can see that my spacing was still a little off even with all of the math and measuring but the resulting cake was still perfect for effect.

surprise-inside-cake-road-construction-free-tutorial-deborah-stauch

Add another thin layer of black frosting on top of the strips.


surprise-inside-cake-road-construction-free-tutorial-deborah-stauch

The end view should now look something like this. Only better. 'Cuz you're learning from my mistakes. Right?


surprise-inside-cake-road-construction-free-tutorial-deborah-stauch

Top with the second cake. Frost the entire exterior of the cake with the remaining black frosting.

Place the reserved cake scraps in a food processor and pulse a couple of times to form coarse crumbs. Press the crumbs into the sides and ends of the cake, leaving the top smooth.

Roll out a piece of black modeling chocolate about 1 inch less than the width but as long as the top of your cake for the road. Center on top of the black frosting.

Cut the remaining white strips into about 8 segments of about 3/4th inch long each and space evenly on the black road.

surprise-inside-cake-road-construction-free-tutorial-deborah-stauch

If you didn't mold your decorations in advance, now's the time. When they are set up, add them around the cake along with the candy rocks and optional stickers. You can personalize a truck, vest or hardhat or print road signs to edible frosting sheets if you'd like.


surprise-inside-cake-road-construction-free-tutorial-deborah-stauch

Here's a shot of the edible logo on the truck door applied with a tiny dab of corn syrup.

surprise-inside-cake-road-construction-free-tutorial-deborah-stauch

I applied the same logo to the hat using the same method. One sheet of tiny logos went a LONG way!


surprise-inside-cake-road-construction-free-tutorial-deborah-stauch

I didn't waste the edible logos on these non-edible toppers but wanted to cover up the John Deere logo. So these were printed on regular paper to go along withe the "Hats off to Granite Employees!" theme.


surprise-inside-cake-road-construction-free-tutorial-deborah-stauch

Hope you enjoyed this fun but simple and TaStY construction project! Now grab a fork (or a shovel) and get to the real work of devouring your moist delicious creation!

surprise-inside-cake-road-construction-free-tutorial-deborah-stauch

If you won't be there for the cutting of the cake, be sure to tell the server to slice across the cake to reveal the surprise!

UPDATE:
This plan can be adapted to any letter or number (or entire name if you're that industrious) or a simple oval racetrack. Here is an example of a roadway font by Susanne Fiedler on Dingfontbats. 

surprise-inside-cake-road-construction-free-tutorial-deborah-stauch


You can download it for free here but you'll need permission to use it commercially. Or you could enlarge any block style font and add the dotted lane lines for a pattern. For a quick alternative, use the jumbo paper mache or chipboard letters or numbers from your local craft store as cake carving guides and then cover or paint them to work into your party decorations.

surprise-inside-cake-road-construction-free-tutorial-deborah-stauch

This chart on how to carve number cakes may come in handy for some of the cake ideas shown below.

surprise-inside-cake-road-construction-free-tutorial-deborah-stauch
cakejournal.com

surprise-inside-cake-road-construction-free-tutorial-deborah-stauch
sugarcraft.com


surprise-inside-cake-road-construction-free-tutorial-deborah-stauch
geeliciousconfections.com/specialty-carved-cakes

And don't limit the fun to the little ones. This cake by Cake Central user ApelilaRains for a 40 year old could be adapted for a car enthusiast of any age.


Deborah


Tuesday, April 15, 2014

Surprise Inside Cake - Hidden Giraffe Pattern


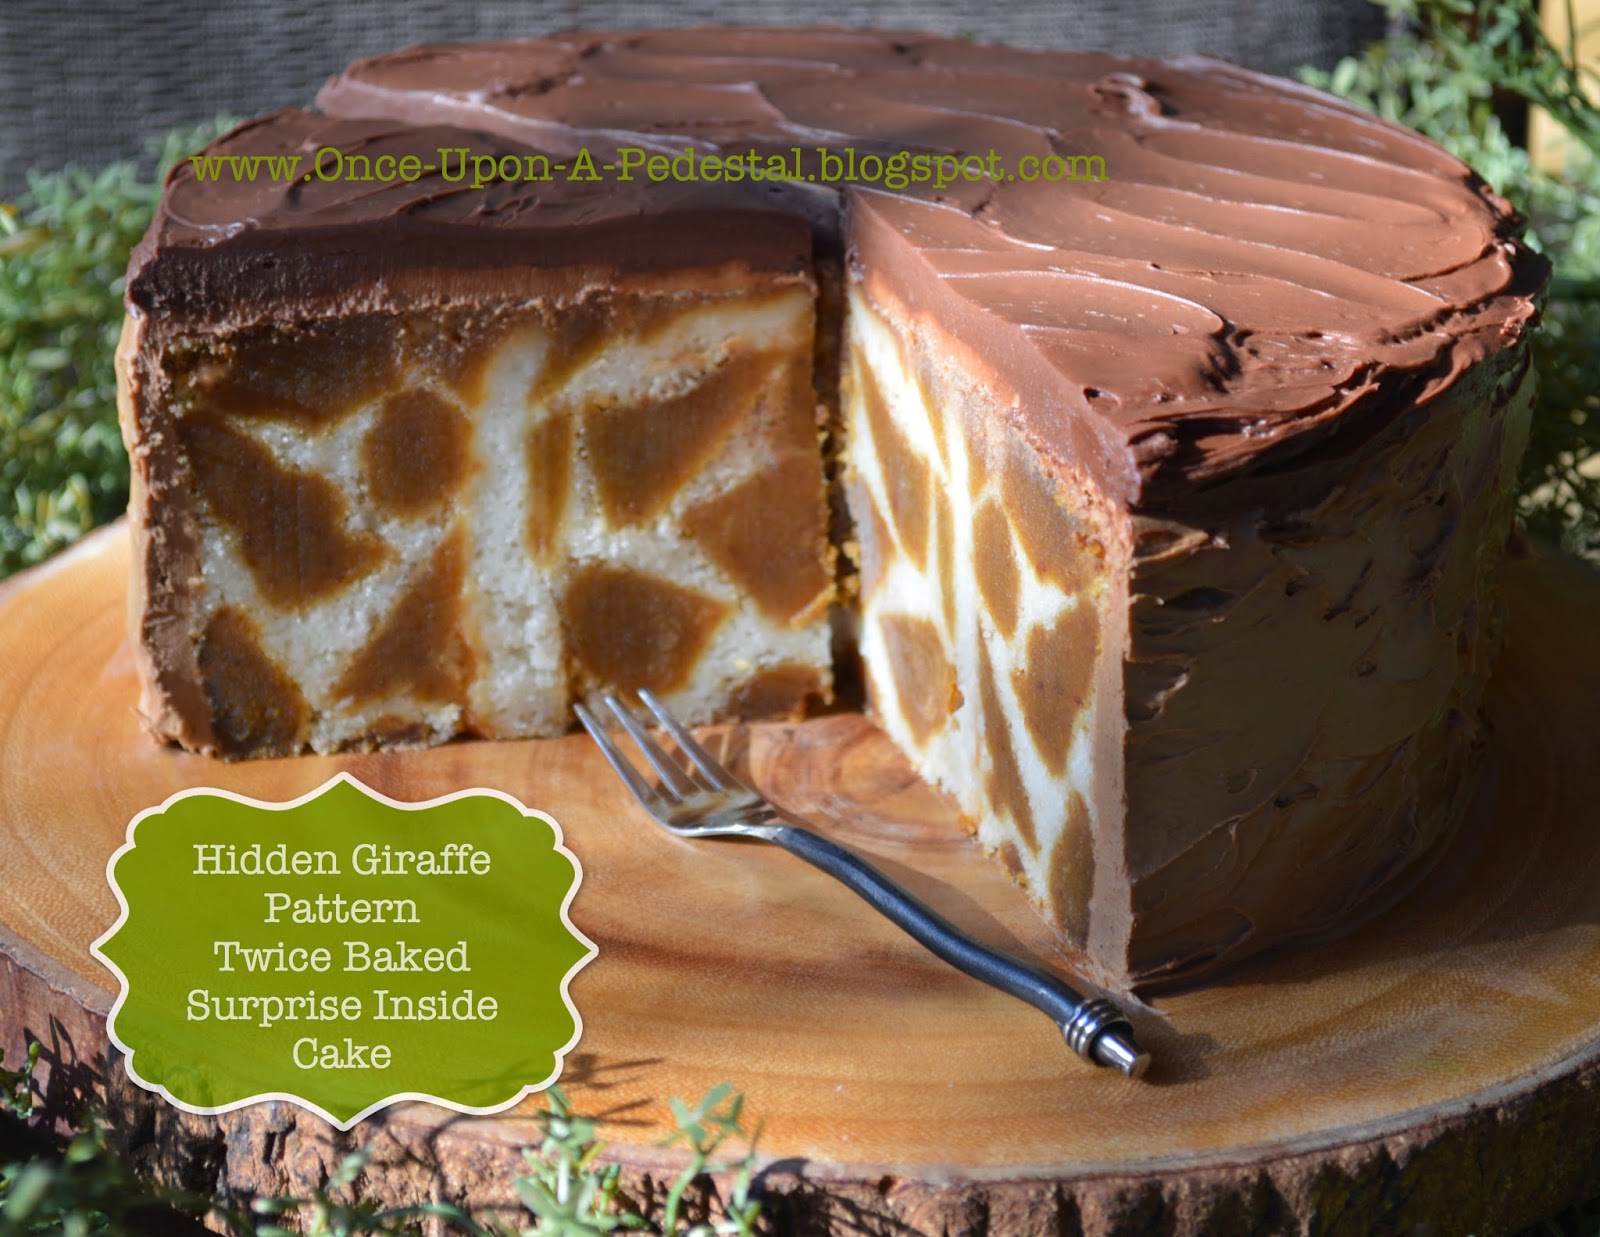
Here's another design I'm perfecting for you. A surprise inside giraffe pattern hidden in a twice baked cake! 

giraffe-cake-surprise-inside-animal-pattern-deborah-stauch
Giraffe patterns are everywhere on the exteriors of cakes.  But on the inside? Not so much. And never in a round cake that I've been able to find so far.

A little trickier but you'll be able to do it with no problem. Promise.

Hope you can add this to your collection of DIY surprise inside animal prints one day soon! I'm SO excited to show you how!!!

Thanks for stopping by!
Deborah

Monday, April 14, 2014

Surprise Inside Cake - Hidden Chevrons


surprise-inside-cake-chevron-deborah-stauch
I started working on this surprise inside twice baked chevron cake ages ago.
After MANY failed attempts, I finally came up with this one. Even though it had possibilities, it still isn't good enough to share. Almost but not quite.

surprise-inside-cake-chevron-deborah-stauch
But compared to even earlier experiments like this one, it's gotten much better. Poor little Charlie Brown chevron cake. : (

surprise-inside-cake-chevron-deborah-stauch
Please don't laugh at this one. It was meant to be a gluten free version.

In any event, I've tried this design at least a dozen different ways now and while I've learned what DOESN'T work, I've also learned what does. So I'm saving the best and tried and true methods for my book. After all, I only want what's best for you.

I hope that you'll still love chevrons by then but even if that's not the case, the methods I'll share with you can be used to put nearly any design you come up with inside a cake.

Patience is a virtue (but not my strength for sure) so please be virtuous and patient with me as I continue messing up my kitchen over and over so that you won't have to.

Confectionately yours,
Deborah


Tuesday, October 8, 2013

Surprise Inside Cake - Hidden Acorns and Oak Leaves

Hope you are enjoying the wonderful fall weather where ever you are! Fall and Spring hold a special place in my heart. Spring maybe more so because the leaves aren't dropping like flies. But the acorns are SO cute. Hard to pick a favorite.
suprise-inside-cake-leaves-edible-acorns-recipe-tutorial-deborah-stauch
This is the cake that the 2 ingredient chocolate candy acorns were used for.

suprise-inside-cake-leaves-edible-acorns-recipe-tutorial-deborah-stauch
The colors did NOT turn out like I'd hoped so I thought you might like see them in black and white.

suprise-inside-cake-leaves-edible-acorns-recipe-tutorial-deborah-stauch
Here's the original. I like the no color version best for now. Agree? Someday I'll have a do over. Just not this fall.

Happy Caking!

Saturday, October 5, 2013

Surprise Inside Cake - Hidden Mickey Mouse


Here's another twice baked cake for you. I usually plan the final photo a bit more but on this particular day it was just, "Stick a fork in him, he's done." Poor Mickey.

mickey-mouse-suprise-inside-cake-deborah-stauch

UPDATE: A few of you have asked for a tutorial but I'm sorry to say I didn't make a complete one for this cake. I live at high altitude or "at altitude" per the specialty cook books so the recipes I use most likely won't work the best for most of you. Here is a brief summary of what I wrote down at the time but you can use your favorite pound cake and frosting recipes and it should turn out just fine.

mickey-mouse-suprise-inside-cake-tutorial-deborah-stauch

and here's a link to someone that took a bit more time to document the process a little later on . . . http://www.momfluential.net/2014/03/04/hidden-mickey-cake/

Happy Caking!

Deborah

Thursday, September 26, 2013

Surprise Inside Cake - Mini Skeletons

 a
halloween-cake-suprise-inside-skeleton-coffin-free-tutorial-deborah-stauch

It's never too early to get some practice in for Halloween!!!


                    halloween-cake-suprise-inside-skeleton-coffin-free-tutorial-deborah-stauch


You've probably already seen these tiny bone sprinkles around for several years now. I don't recall ever seeing the skulls.


                    halloween-cake-suprise-inside-skeleton-coffin-free-tutorial-deborah-stauch
If I did, MY head wasn't in it at the time and I just walked on right by. But one day not too long ago, I was in my favorite new baking supply store and mixed in with all of the fun Halloween pans and purple/lime/orange/black sprinklewere these wee little heads. Right next to the bones which were right next to the coffin pans. Which is how it should be.

The name of the store is GYGI (pronounced, "Ghee, Ghee") and it's like a kitchen store on steroids. If you're ever in the area, you simply must plan a few hours minutes to drool. Take a cloth. It's that bad good.
                                                 halloween-cake-suprise-inside-skeleton-coffin-free-tutorial-deborah-stauch
On some of the packaging Wilton calls them "Jumbo" but jumbo they are not. See how little they are?


I picked up one container each of the bones and heads and home I went to play forensic anthropologist. Or something like that. No lab coat or anything. Not even an apron. Armed only with sheer guts and a small polka dot knife.

halloween-cake-suprise-inside-skeleton-coffin-free-tutorial-deborah-stauch

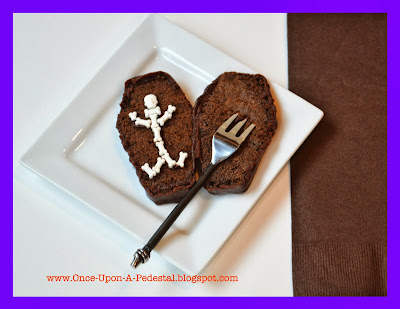
It wasn't long before I'd arranged the pieces into this cute little guy. No rib cage but he stands tall just the same. I think I was happiest with the bow tie. Until I cut a bone in half to make the hands. Ta Da! Hello there Mr. Bones!
a
halloween-cake-suprise-inside-skeleton-coffin-free-tutorial-deborah-stauch

He looks right at home in Wilton's coffin pan . . .
a
          halloween-cake-suprise-inside-skeleton-coffin-free-tutorial-deborah-stauch
a
. . . but it only makes 6 treats at a time. He also needs a third bone in his spine to make him taller and more to scale. Note that he has 2 leg bones instead of one. To give him a leg up on the competition. Okay. Lame. Well he's not lame. Technically he's dead. Moving on . . . 
a
                           halloween-cake-suprise-inside-skeleton-coffin-free-tutorial-deborah-stauch
a
Six treats are not a problem if you're making chocolate Rice Krispie Treats where half or more of the batter isn't setting about while you bake but not so great if you just mixed up an entire cake mix.  (UPDATE: I've had pretty good luck baking the remaining batter even though it's set around a while. Cover it and pop it in the frig until you're ready to fill the pans again.) This pan would be great for a small gathering or family dessert where you only need to make six of something.
a
                                        halloween-cake-suprise-inside-skeleton-coffin-free-tutorial-deborah-stauch
a
I opted for a shorter fatter coffin cookie cutter from Wiltons' Vampire set and baked the cake in thin layers in 2 jelly roll pans which gave me 21-22 treats. You could use this same idea for cookies or brownies without too many alterations.

                halloween-cake-suprise-inside-skeleton-coffin-free-tutorial-deborah-stauch

Dig in!


               halloween-cake-suprise-inside-skeleton-coffin-free-tutorial-deborah-stauch

Surprise Inside Skeletons
Yield 21 mini cakes
a
Equipment
(2) 12 x 17 x 1 inch jellyroll pans
Paring knife
Coffin cookie cutter (3.5 inches tall x 2 inches wide at fattest point) 
Baking parchment to fit jellyroll pans
Small offset spatula
Small bowl of water
Paper towels
Small art paint brush
Piping bag with #3 round tip
Cooling rack 12 x 17 for decorating
Small bowls for candy parts (optional)

Ingredients
Chocolate cake mix plus oil, water and eggs per package
(2) 16 oz cans chocolate frosting
Baking spray with flour
Wilton Bone Sprinkles (3.53 oz/100g) (21 uses slightly less than half of the container)
Wilton Skull Sprinkles (3.5 oz/99g) (21 doesn't even put a noticeable dent in the container)
Optional:
Frosting, fondant, gummy worms, cookie headstones, cookie crumbs for decorating


Directions
Preheat oven to 350 degrees F. Spray the pans with non-stick baking spray. Line the pans with parchment and spray a second time.

Prepare cake mix as directed on package. Divide batter evenly between the pans and smooth to a thin even layer using the offset spatula.
Bake for 6 minutes watching closely and turning pans at 3 minutes for even baking. Dampen enough paper towels to cover each pan.
Remove pans from oven and immediately press the damp paper towels on the top of each pan to flatten the layers.
Use the bottom of the pans to help level. This just takes a couple of seconds when the cakes are hot.
Set aside pans to cool completely.

                    halloween-cake-suprise-inside-skeleton-coffin-free-tutorial-deborah-stauch

While cakes are cooling, cut 21 bones in half with the paring knife.
Separate 21 white skulls from the container.
Fill the piping bag with chocolate frosting.

Invert the cooled baked layers onto clean parchment sheets. Cut 21 shapes from each layer (3 rows of 7) with the coffin cookie cutter.
Save the remaining crumbs for decorating the grave yard to look like freshly dug graves if desired.

Set the cut shapes onto parchment lined jellyroll pans and it's on to the good stuff . . . 

Decorating

                    halloween-cake-suprise-inside-skeleton-coffin-free-tutorial-deborah-stauch


Trial run: place one set of the bones in place on top of one of the coffin shapes or inside the coffin cookie cutter in order to learn the spacing and angles of the bones.
Use this as your temporary pattern.

Fill a small bowl with water.
Dampen paint brush as needed and wipe excess off on paper towel to remove any frosting smudges from the bones as you work. But only if you're a bit messy like I am.

Pipe small dots of chocolate frosting onto the coffin shapes for the head and bow tie and attach them to the dots.

Pipe a small line for the center of the skeleton, about 1 1/4" long or the length of 3 bones. Attach the bones to the line.

Pipe small segments for the arms and dots for the hands and attach the bones to the dots.

Pipe an upside down "V" for the legs, starting at the center of the lowest center bone. Attach legs.

Pipe 2 segments for the feet and attach them. Legs and feet will resemble a loose "W"shape.

Repeat 20 times, leaving half of the cut coffin shapes plain to be used as the lids.
Pipe a small border around the edge of the coffin and set the lids over the assembled skeletons. Freeze until firm for decorating ease.

                    halloween-cake-suprise-inside-skeleton-coffin-free-tutorial-deborah-stauch

Place the frozen coffins on the cooling rack over the jellyroll pan to catch the excess frosting as it drips.


                    halloween-cake-suprise-inside-skeleton-coffin-free-tutorial-deborah-stauch

Heat the remaining chocolate frosting in the microwave until pourable.
Time varies by microwave but in mine the time was about 2 minutes total at 40% power, one minute at a time.
Tap the frosting bowl on the counter to remove bubbles. Spoon the frosting over the tops of the coffins and down the sides.
Repeat until a smooth finish is achieved. Reuse and reheat the frosting drippings as needed.

Transfer the coffins to their resting place and decorate the exteriors as desired.


Here are just a few of the many possibilities:
- Use gray frosting to write funny sayings on cookie headstones
- Arrange the coffins in a graveyard setting using the leftover cake crumbs as fresh dirt
- Add gummy worms, bats, spiders, ghosts, witches and cats to dress up the scene
- Use fondant or modeling chocolate and the coffin cookie cutter to cut lids for the coffins   
  and cut strips to form the sides for a more finished look

Some funny headstone ideas I found online:
          Theo Later
          U.R. Gone
          I.M. Goner
          Ray N. Carnation
          Dustin T. Dust
          Lev Itation
          G.I. Miss You
          Trudy Departed
          Rust N. Peace
          Rest N. Pieces
          I.L. Beback
          M.T. Tomb
          Underneath Lies Mr. Jones, Sadly now a bag of bones


Happy Haunting!!!